#css for dummies
Explore tagged Tumblr posts
Visit Tumblr Blog
Explore Tumblr blogs with no restrictions, modern design and the best experience.
Last Seen Tumblr Blogs


Fun Fact
The total number of visits Tumblr.com received during January 2021 is 327 million.
Text
build-a-divider tool v1.0 is ONLINE!
Yes yes yes! I'm really happy with it so far! Since my lovely svg images don't work on AO3 (as yet), I added an option for gradients. Also nice!

So folks, there it is, you can go give your fanfiction some lovely dividers without having to learn a thing about CSS. Just play around a bit and copypaste the resulting code.
🌟 Have Fun! 🌟
(If you've missed what this is about: how to make pretty AND accessible dividers in my AO3 formatting manual)
13 notes
·
View notes
Text

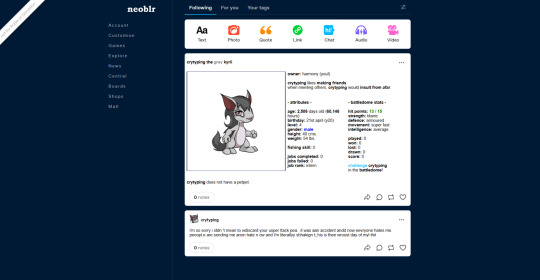
Them
click for better quality why are you like this tumblr
ramble about designs and headcanons
All of them are a few years older than in canon cause I wanted to
As aforementioned I gave Mantha some bellbottoms swag because I imagine she grew up in the 70s before she died. Also just tried to make her look more zombie like while keeping the colour pallet.
Ra’s design didn’t change much I just added more detail. I used to imagine his skirt was made of denim as a neat modernisation but idk if it still works with the design now. Also I messed up his face but don’t look at it too hard. I’m not entirely sold on his design since I worry he looks like he’s in a costume compared to the rest of them. But idk maybe he’s just got a killer skin care routine.
I think it’d be funny if Casper despite wanting to be friendly actually looked more on the scary side so hence why he’s Like That. I wanted to give him period accurate clothing but it all sucks so I went back to the sweater and just gave him an undershirt with a large collar to vaguely allude to the 1800s. Also ik it doesn’t fit the movie but I hc that he froze to death hence the black frostbite-adjacent stuff.
Thatch’s canon design is acc so funny to me with his dress shirt and low rise jeans and chain so I just upped that. Dude wants to be punk so bad but he’s still got the rich kid mentality of needing his clothes to look neat and high quality. Anyway, Dummy Girl gave him the gloves. Also I had to change his hair I’m sorry even Thatch deserves better.
Dummy Girl’s design also didn’t change much but I gave her bigger platform shoes cause ya girl is short. She has the opposite problem to Casper (looks cute but would kill)
I didn’t draw it very well but Techwear Slither entered my head and wouldn’t leave me alone. So you get this. Added green to make him look more monster like. Also Slither in a skirt is necessary and iconic.
#casper’s scare school#css#mantha#css ra#thatch#dummy girl#slither#casper the friendly ghost#i made an art
21 notes
·
View notes
Text
anyone have a really good low contrast site skin for ao3?
because I have been Suffering with reversi (dark mode) since I got an account because black background/white text is better than white background/black text but dang it I wish I could have tumblr's low contrast setting for ao3 too lol
#ao3#archive of our own#i'm not tech-savy enough to write my own lol and every search ive tried has found me nothing#i found a promising one but it ended up too close to reversi to actually make a difference#dark background and light-but-not-white text would be Ideal#ooooooor if someone can just give me the 'css for dummies' version of how to do it myself that would still be awesome
1 note
·
View note
Text
here's what i needed the dummy post for: the funniest css i've ever coded in my life
701 notes
·
View notes
Text
Edgaring time!
Tutorial on how to make your own responsive Edgar :D I will try to explain it in really basic terms, like you’ve never touched a puter (which if you’re making this… I’m sure you’ve touched plenty of computers amirite??? EL APLAUSO SEÑOOOREEES).
If you have some experience I tried to highlight the most important things so you won’t have to read everything, this is literally building a website but easier.
I will only show how to make him move like this:
Disclaimer: I’m a yapper.
Choosing an engine First of all you’ll need something that will allow you to display a responsive background, I used LivelyWallpaper since it’s free and open-source (we love open-source).
Choosing an IDE Next is having any IDE to make some silly code! (Unless you can rawdog code… Which would be honestly impressive and you need to slide in my DMs and we will make out) I use Visual Studio!!!
So now that we have those two things we just need to set up the structure we will use.
Project structure
We will now create our project, which I will call “Edgar”, we will include some things inside as follows:
Edgar
img (folder that will contain images) - thumbnail.png (I literally just have a png of his face :]) - [some svgs…]
face.js (script that will make him interactive)
index.html (script that structures his face!)
LivelyInfo,json (script that LivelyWallpaper uses to display your new wallpaper)
style.css (script we will use to paint him!)
All of those scripts are just literally like a “.txt” file but instead of “.txt” we use “.js”, “.html”, etc… You know? We just write stuff and tell the puter it’s in “.{language}”, nothing fancy.
index.html
Basically the way you build his silly little face! Here’s the code:
<!doctype html> <html> <head> <meta charset="utf-8"> <title>Face!</title> <link rel = "stylesheet" type = "text/css" href = "style.css"> </head> <body> <div class="area"> <div class="face"> <div class="eyes"> <div class="eyeR"></div> <div class="eyeL"></div> </div> <div class="mouth"></div> </div> </div> <script src="face.js"></script> </body> </html>
Ok so now some of you will be thinking “Why would you use eyeR and eyeL? Just use eye!“ and you’d be right but I’m a dummy who couldn’t handle making two different instances of the same object and altering it… It’s scary but if you can do it, please please please teach me ;0;!!!
Area comes in handy to the caress function we will implement in the next module (script)! It encapsulates face.
Face just contains the elements inside, trust me it made sense but i can’t remember why…
Eyes contains each different eye, probably here because I wanted to reuse code and it did not work out and when I kept going I was too scared to restructure it.
EyeR/EyeL are the eyes! We will paint them in the “.css”.
Mouth, like the eyeR/eyeL, will be used in the “.css”.
face.js
Here I will only show how to make it so he feels you mouse on top of him! Too ashamed of how I coded the kisses… Believe me, it’s not pretty at all and so sooo repetitive…
// ######################### // ## CONSTANTS ## // ######################### const area = document.querySelector('.area'); const face = document.querySelector('.face'); const mouth = document.querySelector('.mouth'); const eyeL = document.querySelector('.eyeL'); const eyeR = document.querySelector('.eyeR'); // ######################### // ## CARESS HIM ## // ######################### // When the mouse enters the area the face will follow the mouse area.addEventListener('mousemove', (event) => { const rect = area.getBoundingClientRect(); const x = event.clientX - rect.left; const y = event.clientY - rect.top; face.style.left = `${x}px`; face.style.top = `${y}px`; }); // When the mouse leaves the area the face will return to the original position area.addEventListener('mouseout', () => { face.style.left = '50%'; face.style.top = '50%'; });
God bless my past self for explaining it so well, but tbf it’s really simple,,
style.css
body { padding: 0; margin: 0; background: #c9c368; overflow: hidden; } .area { width: 55vh; height: 55vh; position: absolute; top: 50%; left: 50%; transform: translate(-50%,-50%); background: transparent; display: flex; } .face { width: 55vh; height: 55vh; position: absolute; top: 50%; left: 50%; transform: translate(-50%,-50%); background: transparent; display: flex; justify-content: center; align-items: center; transition: 0.5s ease-out; } .mouth { width: 75vh; height: 70vh; position: absolute; bottom: 5vh; background: transparent; border-radius: 100%; border: 1vh solid #000; border-color: transparent transparent black transparent; pointer-events: none; animation: mouth-sad 3s 420s forwards step-end; } .face:hover .mouth { animation: mouth-happy 0.5s forwards; } .eyes { position: relative; bottom: 27%; display: flex; } .eyes .eyeR { position: relative; width: 13vh; height: 13vh; display: block; background: black; margin-right: 11vh; border-radius: 50%; transition: 1s ease } .face:hover .eyeR { transform: translateY(10vh); border-radius: 20px 100% 20px 100%; } .eyes .eyeL { position: relative; width: 13vh; height: 13vh; display: block; background: black; margin-left: 11vh; border-radius: 50%; transition: 1s ease; } .face:hover .eyeL { transform: translateY(10vh); border-radius: 100% 20px 100% 20px; } @keyframes mouth-happy { 0% { background-color: transparent; height: 70vh; width: 75vh; } 100% { border-radius: 0 0 25% 25%; transform: translateY(-10vh); } } @keyframes mouth-sad { 12.5%{ height: 35vh; width: 67vh; } 25% { height: 10vh; width: 60vh; } 37.5% { width: 53vh; border-radius: 0%; border-bottom-color: black; } 50% { width: 60vh; height: 10vh; transform: translateY(11vh); border-radius: 100%; border-color: black transparent transparent transparent; } 62.5% { width: 64vh; height: 20vh; transform: translateY(21vh); } 75% { width: 69vh; height: 40vh; transform: translateY(41vh); } 87.5% { width: 75vh; height: 70vh; transform: translateY(71vh); } 100% { width: 77vh; height: 90vh; border-color: black transparent transparent transparent; transform: translateY(91vh); } }
I didn’t show it but this also makes it so if you don’t pay attention to him he will get sad (mouth-sad, tried to make it as accurate to the movie as possible, that’s why it’s choppy!)
The .hover is what makes him go like a creature when you hover over him, if you want to change it just… Change it! If you’d rather him always have the same expression, delete it!
Anyway, lots of easy stuff, lots of code that I didn’t reuse and I probably should’ve (the eyes!!! Can someone please tell me a way I can just… Mirror the other or something…? There must be a way!!!) So now this is when we do a thinking exercise in which you think about me as like someone who is kind of dumb and take some pity on me.
LivelyInfo.json
{ "AppVersion": "1.0.0.0", "Title": "Edgar", "Thumbnail": "img/thumbnail.png", "Preview": "thumbnail.png", "Desc": "It's me!.", "Author": "Champagne?", "License": "", "Type": 1, "FileName": "index.html" }
Easy stuff!!!
Conclusion
This could've been a project on git but i'm not ready and we're already finished. I'm curious about how this will be seen on mobile and PC,,, i'm not one to post here.
Sorry if I rambled too much or if i didn't explain something good enough! If you have any doubts please don't hesitate to ask.
And if you add any functionality to my code or see improvements please please please tell me, or make your own post!
98 notes
·
View notes
Note
sorry if you’ve answered something similar before but how do you format things for your website? in the collections you have for poems
i love how it looks. the book kind of format it has
and i want to do similar/the same formatting for my own works but im really struggling…
i've been asked stuff like this a lot and i don't mind explaining it often because i want people to make websites more. i made a tutorial video at some point but it's kind of hard to make a curriculum or tutorial or whatever around this kind of thing because it's really just a self expression thing. i'll try to break down as much of my thought process as makes sense.
i design my pages in photoshop with either double/single page display in mind and then i use html to set them next to each other. most of the choice here comes down to how overwhelming i want my designs to feel. in the case of the lonely leaver page, the entire book was designed to be something that could be a physical book, and so from the getgo i made the pages in that kind of format. i previewed things in acrobat which has a booklet view mode (which singles out the front and back cover around the contents of the file) & allows you to process double page view as well. as for the actual process in photoshop before that point, i typically will open a canvas that is the size of the full 2 page spread (i.e. 8 inches wide for 2 pages which are both 4 inches wide) and i set grid lines for bleed margins and to mark the center of the page so that i can make the composition something that im comfortable with having a gap in the middle from the book folding. with lonely leaver i had to reformat about half the book at some point because i wanted to make it a larger resolution which was annoying but i just keep my guidelines for a print size in mind while im working. often if im a certain amount of time into a project that i feel like i will be spending a lot more time with i'll create a dummy psd file at this point which is devoid of content but which has all of the margins/resolution stuff set up already so i can just open that up and save a different version of it when i'm done.
my actual writing process and my design process is generally extremely intertwined, that's why things tend to be varying degrees stream of conscious in my work i think. i'll for instance, have a thought im stuck on for several days, and then open photoshop without having a poem or comic in mind, but i'll fill the canvas with some kind of color like red or yellow or a photo or whatever, and then open a text box or start drawing. telling a story through composition (i.e. page layout itself) is generally my favorite aspect of art and design because i enjoy how violent and dramatic framing angles can make the content of a piece feel so i'll try to move stuff around as much as possible in order to get my desired effect, often times using place holder shapes in lieu of finished design elements in order to get a rough blocking. as i do this i tend to react to what i'm writing/making as i'm doing it, and i do a lot of selective self editing during this part. for instance, i'll start manipulating rasterized text or cutting around images or whatever. i'll reread and look at whatever im doing for a couple of hours and then when i'm done with a spread or whatever i will save the document as a psd with a combined full spread and then each page separately as pngs or whatever (split at the middle grid line, back to the example, i'll save 2 different 4 inch wide images by changing the canvas size).
when it's time for me to put stuff on my website i then batch convert whatever pngs i exported into webp's because they load faster and take up less space on the server/my computer. you can look at my direct html/css files in your internet browser's explorer mode to see exactly what i do but essentially i just have either 1 or 2 images in a block and then a series of repeating vertical blocks containing images. i don't have an extremely efficient way of uploading pages and i'll typically just copy the same
"<p><img src="01.png"> <p><img src="02.png">"
like, 30 or 40 times or whatever into a html document. i use visual studio code for this stuff because it lets me do a bunch of stuff like having several files open at once & the navigation pane is nice & there's a live server extension that automatically refereshes the html file in my web browser on file save which is really awesome. i have a css page that i made like, 5 years ago, and i usually just link new projects to that because it has a bunch of different settings in it which i'll toggle on or off depending on the needs of whatever page or i'll add new div id's to it. it's kind of messy at this point, but it gets the job done. i use filezilla and something like bluehost or something for webhosting/file management.
i arrange and organize all of my art extremely methodically so usually in my like "<root catch all poetry folder>" inside of my "<root catch all art folder>" there will be a "<name of specific poem book>" folder which just contains the poems named by their actual name e.g. "dedication to saint eulalia 4.png" and then another folder inside of that is called "paginated" where i, using the acrobat document i arrange stuff in as reference, rename copies of my pages which i have placed in that folder to be named things like "01.png" so that i can then manually flip through it sequentially in the windows photo viewer and also just so that i don't have to go through the arduous process of renaming and tracking stuff inside of the root folder i'm containing that project's files in.
i'm 26 now and i made my first website when i was like 18, and my first zine project and i'm tired of feeling feeling around that same time, so i've got like, coming up on a decade of trial and error behind this and this is generally what has worked for me. my website isn't super complicated and mostly just gets the job done but because i try to think about style and presentation up front with whatever projects i'm doing i tend to just make plans based around that as early as it makes sense. to me having a website for art presentation has always been the Primary Method and intended landing zone for my art so it's genuinely always been a consideration in my process to try to plan around how i will put it on my website. i do this because i believe having my own curated space for containing my art allows it to exist in a context which best heightens whatever message i'm trying to convey. if there's an issues with my website right now they are that i'm very bad at mobile browser formatting & i havent updated the main look of the website in something like 4 years barely at all.
anyway, at the end of the day i think really as long as you can identify whatever your intentions are and do some planning/problem solving around that you should probably be able to find your own method which works for you better than mine might but if you do just want to copy my website the tools to do so are within your brain and internet searches and i believe in you. i think the biggest strength of my website is that it shows how easy it is to just put art big as fuck on a webpage and how effective that kind of minimalism can be. i just want my website to be like a museum's walls. and it's not super complicated to get to that level of html knowledge.
11 notes
·
View notes
Text
anyone have good css html for dummies cause im trying to mess around with neocities
4 notes
·
View notes
Text
Update: 3/27/25
Hey guys been awhile...
I am still trying to get my BLS certification T_T I don't know why it's been so hard for me! Well, I do. I'm just anxious I guess about getting it because then that means I can start applying to jobs that require it. It scares me because people's lives will be in my hands, and that's nerve wrecking. I want to try and learn it perfectly. Know it back and front, and that's a lot of pressure so I get a lot of anxiety when I think about having to sit down to study and do the lessons...
I've been doing well with it though lately. This is my 3rd time trying to get this certification. I am the farthest in I have gotten. I'm 24% complete. Based on when my class is I am to get 5% done each day so I can finish on time, but have a reasonable amount to get done each day. Today is my 3rd day doing this and I'm happy to say I'm on track :D I'm surprised at how easy the information is and how well I'm retaining it. Obviously in the real world that may be a different story due to adrenaline, but at least for now I feel confident in my knowledge. I wish I could practice on a dummy for more than a day though!!!
I have three programs in mind for RadTech. On of which isn't accepting applications until 2027. I'm gonna try other schools in the meantime when I'm ready to apply, but that would be my dream school!! I'm looking at their requirements. I had seen one program that said it looked at degree applicable grades, but others say they still look at your cumulative GPA, so I still gotta retake these classes :( I'm doing well though. Right now I'm retaking HTML and CSS. This was back when I had an interest in computers and web design. I realized that part of what makes someone a good fit for RT is an interest in technology which I will use once time for interviews. I have changes my major several times which looks bad, but I have to try to find ways to spin it to actually look good for me T_T Next semester I will retake another computer class. It'll be object oriented design? T_T I really did not get this class, but I have to retake it. I want an A!!! It's unfortunately another night class, and it runs longer than my current night class...but it's only once a week and I need to get rid of the F, so I have to do it...but after that all the other classes I want to retake are more common classes people take and will likely have online options or options at least during the day!! So these should be my only night classes!!! But yeah. not much to update on :(
#sonography#sonographystudent#student#student life#study aesthetic#study blog#study motivation#studyblr#studying#studyspo
3 notes
·
View notes
Text
Week 3 - No Dummy :(
This week was our university's intramurals, which means there were distractions, which means less progress on learning HTML/CSS/JavaScript. I *did* manage to finish the HTML/CSS tutorial, but I haven't gotten around to JavaScript yet— which, from the looks of things, is the most pain-in-the-a to learn. So, I had to push the deadline for our dummy website project. Next week is also looking kinda hairy, with the first wave of quizzes coming up on us. And if I've learned anything these past few semesters of studying in this university, it's that I can't afford to slack off on these quizzes. Minimal website progress for now, but here's a little bit of what I've managed to do:

2 notes
·
View notes
Text
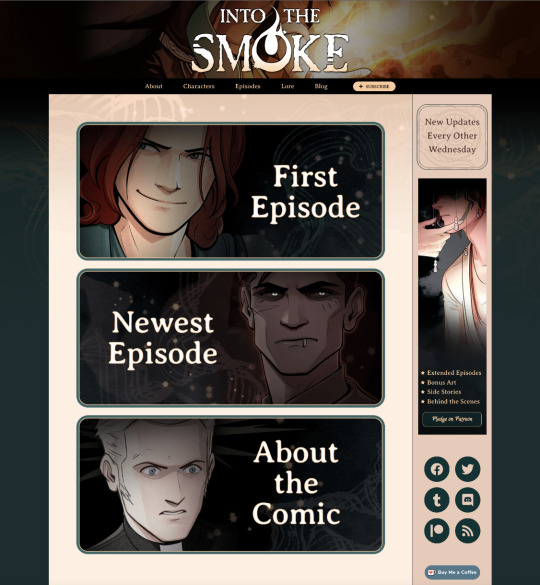
I
I just
I finished it!!!
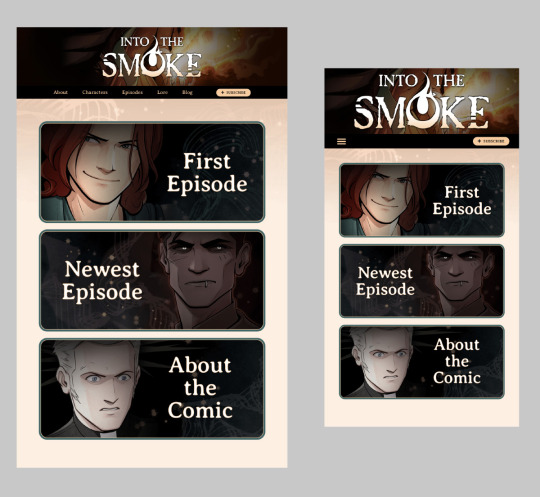
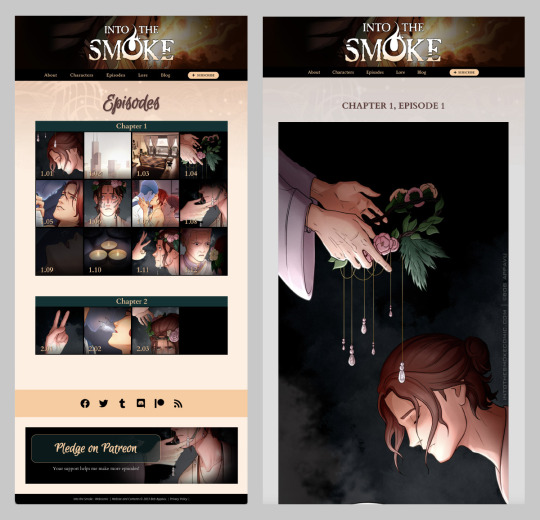
I finished building the entire website. 62 hours of work in 5 days, but I did it. And I'm grudgingly embracing Elementor Pro, since the DOTU website's last major update took me a full month of coding and CSS wrangling and Lynda tutorials and fumbling my way through php since I'm not an actual programmer.
It's also screen reader friendly (I learned to use Mac's built-in voiceover for this), and the episodes have full alt text and expandable transcripts! More on that later...
The episode thumbnails are all placeholders, since I only have the first episode actually "done," and the rest are at various stages of inking or finished pencils. I also ran out of promo art since I've been focusing on pages, so I may swap out images later on. But the actual physical website is fully put together and functional.
I'm not sure when I'll delete all the dummy posts and migrate it from the local development server to the live site. I mean, probably soon, but I need a break. I did this immediately after June's Patreon rewards, so it was an 80-hour stretch without a day off. My brain goes into a very different mode when I do tech stuff, and time ceases to exist, haha.
So yeah, gonna take several days off if I can. I've been living on protein smoothies for a week and I need groceries.
40 notes
·
View notes
Note
hii i tried following that one forum post for a splash screen that you mentioned before in an ask, i didnt really understand it TT could you make a version for dummies? thank you!
Hi Anon,
Do you mean this ask? about this Forum post? I'll try to make it easier then, cause it mainly is some copy-pasting and some light editing.
The Splash Screen, more explanation
The code from the post will create an element that will cover the whole page, and be triggered every time the game loads (or the tab refreshes).
So first, get on the Forum post, and copy the code in the correct places:
Stylesheet
JavaScript
---
Then you will want to edit it to customise it for your project. There is code to change in both block of code:
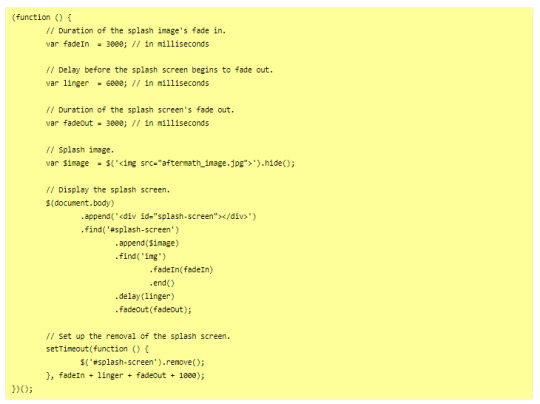
In the JavaScript, you will need to indicate the correct image you want to display on the screen, or any other element (like text).
In the Stylesheet, you will want to edit the colour of the background (and potentially the text colour) to match the vibe.
JavaScript
Here, you will want to edit the correct URL of the image you want to have on the screen.

If you want text instead of the image, you can do so by wrapping it with a < p > markup (or other relevant HTML markup):

though, you will need to edit one more thing to make it work, in the .find() line, like below (p for the < p > element, and so on):
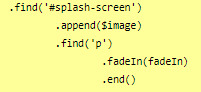
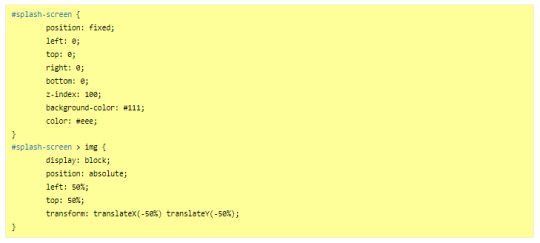
StyleSheet
The biggest change you'd need to make for the code in the style sheet will be with the code below:
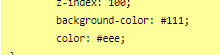
currently, the colours match the basic SugarCube UI colours. So if you've changed the UI palette for your project, you will want to edit those colours (background especially, color is only useful for text)
If you are not using an image, but some text in your splash screen, you will also need to edit this part of the code, to replace the img with the correct HTML markup:
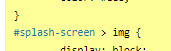
(in the example above, you'd need to change the img with p)
Testing
One important thing afterwards, will be to test the splash screen (for colour, position, or even animation). Note: if you are coding in Twine and used a local image in the splash screen, don't forget to publish to file and open the HTML, rather than test/play through Twine/
If you want to test the Splash Screen, and fiddle with the CSS with the Inspect Tool of your browser, I advise you change the amount of this line in the JavaScript:

Add a bunch of zeros to increase the time (but don’t forget to remove them before uploading your file anywhere).
---
Hope this helps!
27 notes
·
View notes
Text
am i dumb
today i feel defeated because i didn't know you could put a css grid within a grid during this exercise i was doing. it wasn't shown in the tutorial and i only knew because i compared my code with the model code. so when i found out i was ike ???#%#$?^$&
i was so stuck on why this text was below a photo instead of sitting next to it and i feel like i should've known??
i'm just beating myself up at this point but i really couldn't put the pieces together and i'm sad that i'm DUM.
i mean i understand it now but AT WHAT COSTTT it felt like i was blatantly copying what the instructor put in their code even though it kinda wasn't so i feel like a fraud but a dummy at the same time bc i couldn't figure that out :(((((((((((((
this is an example of the problem i was facing:

#real #true
context: the lesson was introducing css grid and explaining how display inline blocks don't automatically apply vertical alignment so grids are better.
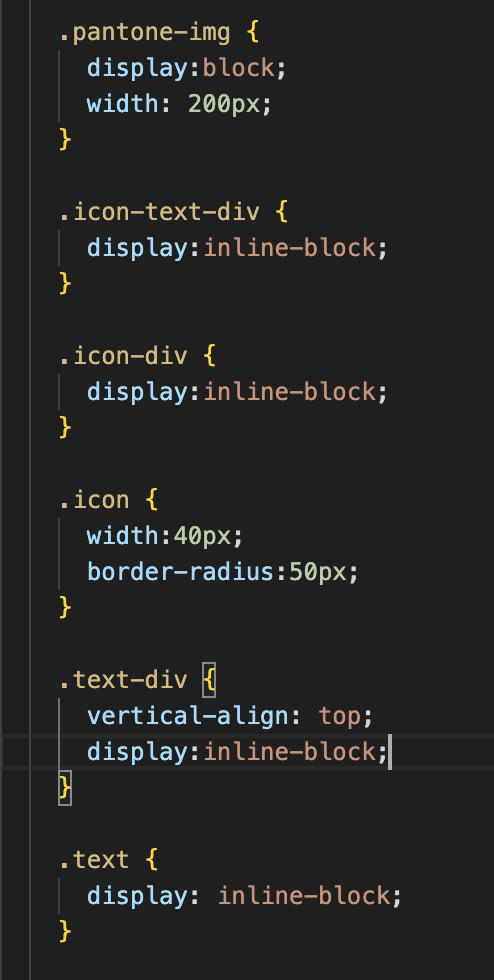
here is my html and css for these example i made and whatnot:
(these contain div elements using the nested layouts technique)
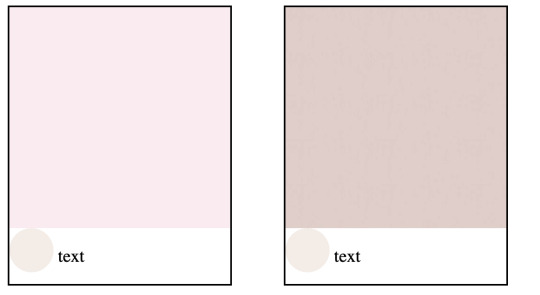
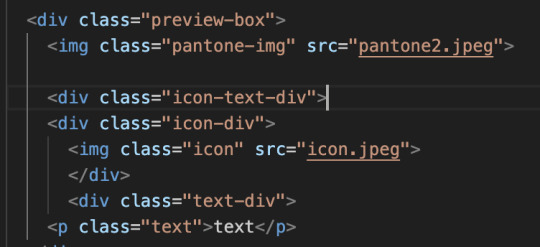
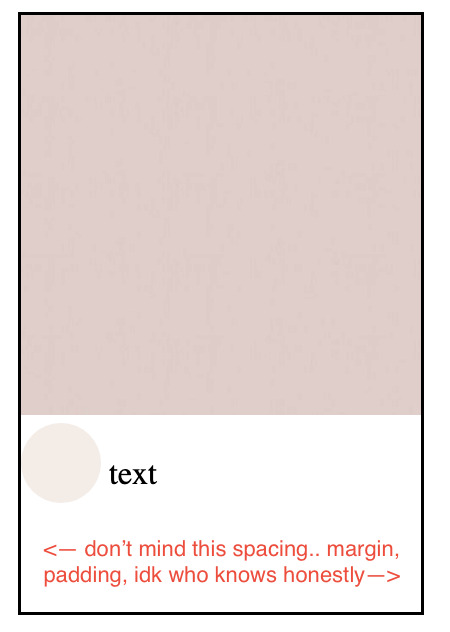
2. i put them in a grid and removed the inline blocks as told by the tutorial (photo is at 100% width) and the text ended up like this:
the text is below the icon now (rounded photo)

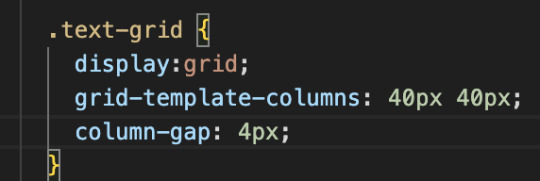
3. found out that the instructor put a grid within the text and icon and so i did the same thing and
this is the html and css + the final outcome:

skjdnwesfh;kjrbgjbfjbgkjrdngkdjtfgnjdfbgrehb
tjgnrjgnregjbr
if i couldn't figure this simple thing out on my own
how will i figure anything out on my own
rip #aminotcutoutforthis #lordsend helpkwe;l;fwef
19 notes
·
View notes
Text
HTML, RichText, and BB_Markup
Back in the day "RichText" or text that can be stylized like you would in Microsoft Word, or an E-Mail, wasn't often available in social media platforms.
And there's still some social media platforms who don't allow it at all.
This has multiple reasons, the processing is done in script at the browser level, and so there used to be performance reasons not to allow it. Or most of your users would experience a slow down just to view the text, why bother with it?
As browsers started getting more comfortable and fast enough to deliver HTML pages, with the markup allowed in HTML, HTML became the default. But as JavaScript grew in popularity, scope and use. HTML itself became a way for people to inject scripts directly into the page.
And instead of just, cleaning script tags and other injection vulnerabilities, websites took HTML away from users all together. This was a problem, in Part, directly influenced by the W3C {World-wide web consortium}, and big-browser (Microsoft, Netscape, and Mozilla, and later Google, Apple, and Opera) who all implemented HTML/CSS/JS differently.
Nobody knows why they did this, they just did. (Actually, there's a bunch of different reasons, but as you look deeper into the rabbit hole, the more absurd it gets.)
After that, forum and social media designers came up with *BB_Markup* I think BB means blackboard, but who knows for sure anymore.
BB was basically a shorthand HTML markup that used square-brackets instead of triangle-brackets, and at a server level, that markup got turned into *safe* HTML markup--to avoid user-level injection attacks.
We also get a bunch of other short hand that may or may not be used in certain platforms (like reddit) to this day. Wrapping text in asterisks to italicize a word, or tildes or the little wavey dash (~) which denote bolding under lining or strike through depending on what you're used to.
All sorts of things that some people who were netizens of the 90s and early-00s might still be in the habit of using.
Today, there's little reason for browsers to even allow <script> or script-referencing mark-up at that particular level anymore. Which would solve A LOT of early security issues. But they don't change it back because a lot of websites still use tricks like that, because that's what developers do.
Even though advertising still allows injection and browser-hijacking at a "user-level" just like in the olden days. Yep, if you host ads, there's a good chance you're allowing those ads to deliver malware to your users.
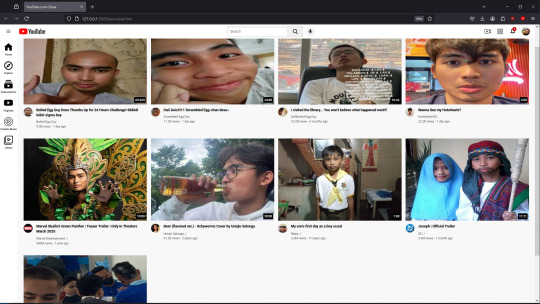
Looking at you YouTube and websites that say "Please stop using ad-block". They don't use them to prevent you from getting paid, they use them to stop you from injecting their device with malware.
You big dummys.
That's part of the reason why I'm an advocate of "ad-reform". Advertising companies are leveraging their ad-platforms for more than simply delivering ads.
There's a drive to put internet tools only in the hands of companies, taking net freedoms a lot of early-adopters take for granted, not like ad-block, more like not having to worry about malware being delivered to you while you're powerless to stop it.
I'm not even talking about internet surveillance, I'm talking about advertising companies delivering malware to office equipment. You know those hacks that seemingly target large databases everyday?
Paid Advertising.
Since a lot of, too many even, Internet users these days even know the basics of HTML/CSS/JS, they don't even get to see what it feels like to have the inspection tools be taken away from you so you can see how it is these websites are f* you.
I can't even [view source] on my phone anymore. *That's considered* a bigger security risk than ad-delivery hijacking *your* phone.
How much does ad delivery cost these days, and you can see, that's the price of delivering malware to the user. Not just advertising products.
11 notes
·
View notes
Text
Currently working on building a new personal website.
I used to have a couple basic Wix.com sites that I used for my college portfolio, and after graduation served as my de-facto "main" site.
I had been meaning to retire it and replace it with something more polished for a while now (especially since taking some actual web design courses!). However, I was never motivated enough to take it down until I started looking into the BDS Movement and similar campaigns. It may not be as big a player as Hewlitt Packard, but it is still a notable company with headquarters in Tel Aviv.
So now I've finally deleted my crummy old site, and I'm setting up a new one for the new year.
I've been browsing through web-hosting services, seeing what's affordable. May install Wordpress at some point. In the meantime, I am also coding a dummy site from scratch (nothing fancy, just some html docs, a plain CSS stylesheet, and some Javascript), just so I can figure out how I want it to look.
#personal post#life update#web design#webdevelopment#artists on tumblr#digital art#html#html css#javascript#work in progress#upgrades people upgrades#i will probably delete my deviantart account too#after I archive everything#leve palestina#boycott divest sanction#wixwebsite#deleted
2 notes
·
View notes
Note
Hola! Soy la anon que preguntó cómo empezar a aprender a codear para hacer skins. A partir de las recomendaciones que me dieron, me puse a investigar y encontré un video en YouTube que, de todos los que vi, fue el que mejor entendí. Está en inglés, pero si llego a encontrar uno igual de claro en español, lo compartiré también por acá:
/watch?v=_GTMOmRrqkU
El video no explica específicamente cómo codear para un foro, pero al final del día, Foroactivo (y prácticamente todas las páginas web) utilizan los mismos tres lenguajes base. Me pareció una buena introducción para quienes, como yo, no sabíamos ni qué era HTML jajaja
Es cortito y básicamente explica qué es HTML, CSS y JavaScript, y cómo se relacionan entre sí, casi que coding para dummies jajaja. No digo que con eso ya vayan a saber hacer skins, pero sí creo que es un muy buen punto de partida. Yo ya empecé a experimentar un poquito gracias a esa guía, y ahora tengo más claro qué buscar o cómo redactar un código cuando quiero hacer “X” cosa.
Le doy tags. B⊕REDOM.
1 note
·
View note
Text
Lightboxes
YAYINDA! https://mguzel.com.tr/lightboxes/
Lightboxes
Lightboxes Shortcodes
The lightboxes are driven by Visual Composer Single Image shortcodes.
Single Image
Simple popups with different styles.
DEFAULT
DEFAULT WITH BORDER
WITH ICON
HOVER EFFECT
Simple Image Gallery
Image gallery in the same row.
Zoom Image Gallery
Image gallery in the same row.
Zoom Image Gallery + Carousel
Dialog with CSS animation
Animations are added with simple CSS transitions, you can make them look however you wish.
Open with fade-zoom animation
Dialog example
This is dummy copy. It is not meant to be read. It has been placed here solely to demonstrate the look and feel of finished, typeset text. Only for show. He who searches for meaning here will be sorely disappointed.
Open with fade-slide animation
Dialog example
This is dummy copy. It is not meant to be read. It has been placed here solely to demonstrate the look and feel of finished, typeset text. Only for show. He who searches for meaning here will be sorely disappointed.
Popup with video or map
In this example lightboxes are automatically disabled on small screen size and default behavior of link is triggered.
Open YouTube Video
Open Vimeo Video
Open Google Map
Open YouTube Video
Open Vimeo Video
Open Google Map
Ajax
You have full control of what is displayed in popup, align it to any side via CSS, enable or disable scroll on right side of window.
Load Ajax Content
Form
Entered data is not lost if you open and close the popup or if you go to another page and then press back browser button.
Open Form
Hata: İletişim formu bulunamadı.
0 notes